PROPAGATING HIBISCUS
Growing your own Hibiscus from seed is rewarding and not difficult. It is fascinating to see color variations from hybridized seeds gathered by hand.

 Hibiscus prefer a sunny location and if given plenty of water they will not disappoint. To be assured of seeds to harvest it is important to give the flowers a little attention and help as soon as they bloom.
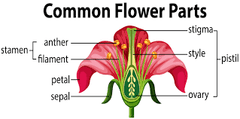

When the flower opens fully its parts will be obvious. The trick is getting the pollen from the stamen to the stigma of the pistil. Because of the distance separating them, we cannot rely solely on bees and other pollinators to do the job.

 Using a Q-tip or small watercolor brush, collect pollen from one flower and gently deposit it on the stigma of another flower. Pollination can also be done by removing the entire pistil from one flower and gently brushing the stamen against the stigma of other flowers.
 If pollination was successful developing seed pods will show in the weeks that follow. If pollination was not successful, the flower and premature pod will simply drop to the ground.
 In the fall, when the seed pods are dry and begin to open, remove them to a dry location. Each pod will contain many individual seeds that can be planted. Depending on your hardiness zone, newly planted seeds may or may not produce blooms in the first year.
In zone 7 I planted seeds in February in my greenhouse and moved the seedlings to the garden in May. They grew rapidly and bloomed the first season. Other seeds that I planted directly to the garden produced healthy seedlings but no flower the first season.
Plant your seeds to a depth of about the thickness of the seed. Whether in a controlled environment or in the garden, make sure to keep the seeds moist and then well-watered after germination.
Springtime is a good time to move new or established plants. The top is completely dead and the roots are very hardy.
A Hibiscus show is a must in the garden.